Context এর মাধ্যমে ডেটা Deeply Pass করা
সাধারণত, আপনি props এর মাধ্যমে একটি প্যারেন্ট কম্পোনেন্ট থেকে একটি চাইল্ড কম্পোনেন্টে ইনফর্মেশন pass করবেন। কিন্তু যদি আপনার props কে মাঝের অনেক অনেক কম্পোনেন্টের মধ্যে দিয়ে pass করা লাগে, অথবা আপনার অ্যাপের অনেক কম্পোনেন্টের একই ইনফর্মেশনের দরকার হয়, তখন props পাস করা শব্দবহুল এবং ঝামেলাপূর্ণ হতে পারে। Context প্যারেন্ট কম্পোনেন্টকে এর নিম্নস্থ যেকোনো স্তরের যেকোনো কম্পোনেন্টের জন্য কিছু ইনফর্মেশন অ্যাভেইলেবল করতে দেয় (সে নিম্নস্থ কম্পোনেন্ট যতই গভীরে হোক না কেনো) এ ইনফর্মেশনকে props এর মাধ্যমে স্পষ্টভাবে pass করাও লাগেনা।
যা যা আপনি শিখবেন
- “Prop drilling (প্রপ ড্রিলিং)” কী
- কিভাবে context এর ব্যবহার করে বার বার prop পাস করা এড়াবেন
- Context ব্যবহারের সাধারণ ক্ষেত্রসমূহ
- Context এর কিছু প্রচলিত বিকল্প
Props পাস করার মূল সমস্যা
প্রপস পাস করা UI tree এর মধ্য দিয়ে ডেটাকে এমন কম্পোনেন্টস যেগুলোর ঐ ডেটা কাজে আসবে সেগুলো পর্যন্ত স্পষ্টভাবে পৌঁছে দেয়ার একটি বেশ ভালো পদ্ধতি।
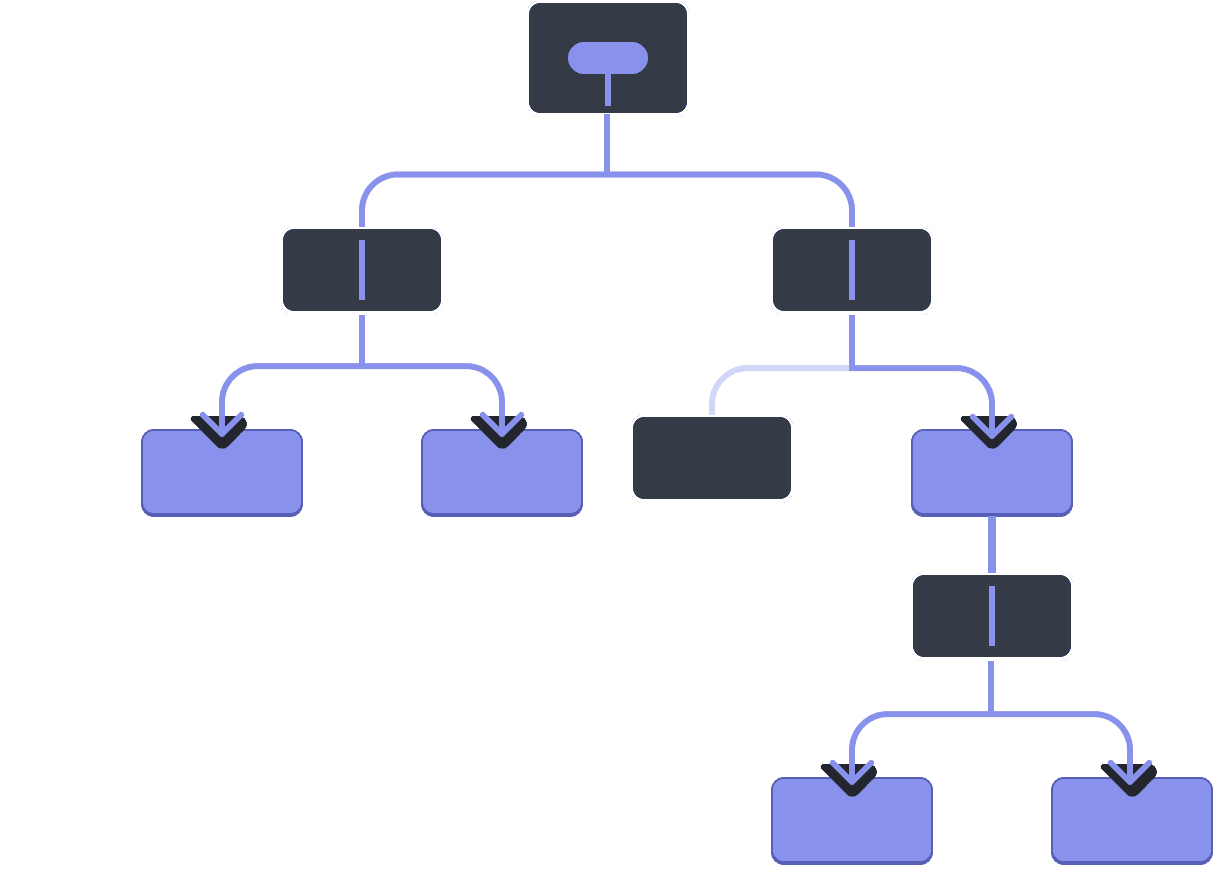
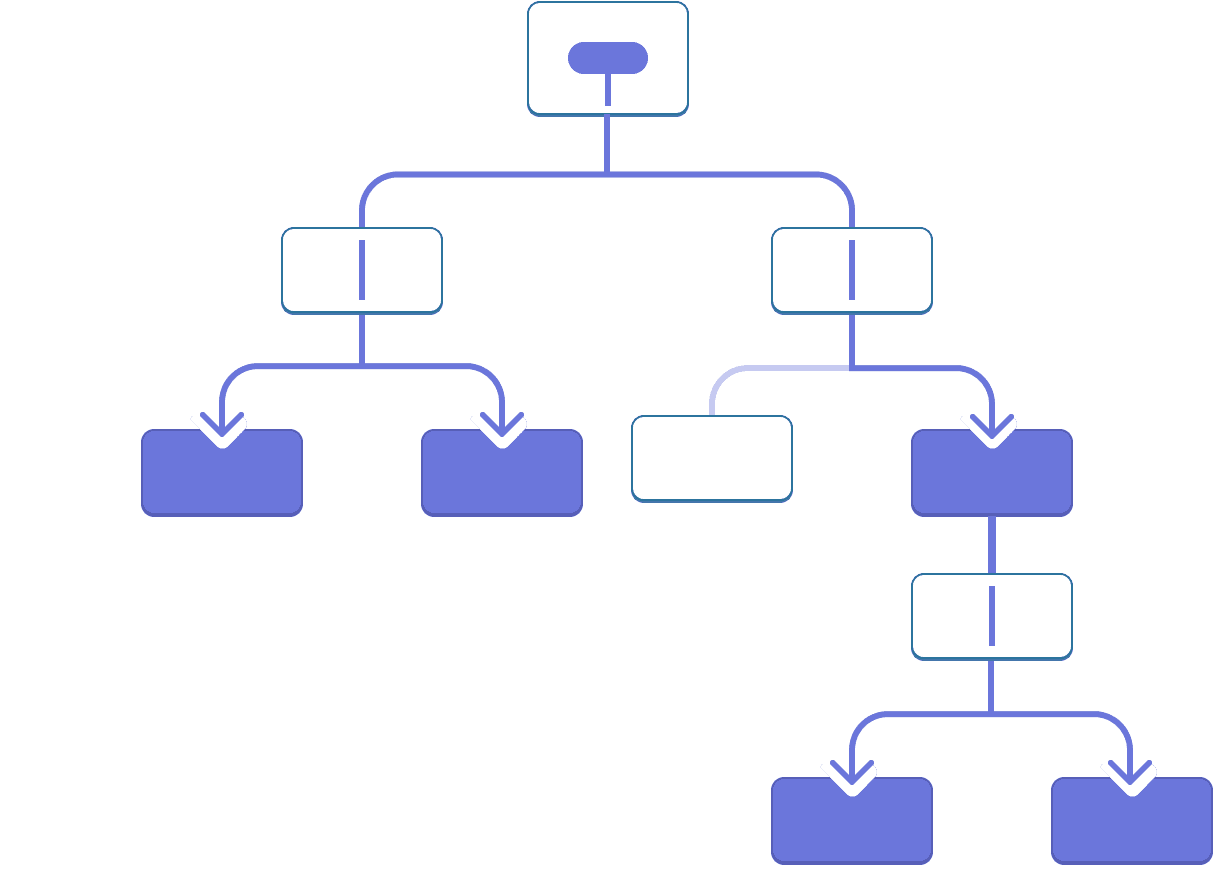
কিন্তু প্রপস পাস করা অনেক শব্দ লেখার এবং ঝামেলার কারণ হতে পরে যখন আপনার কোনো প্রপকে tree এর মধ্য দিয়ে অনেক গভীরে (প্যারেন্ট থেকে অনেক দূরের চাইল্ড পর্যন্ত) পাস করা লাগে কিংবা যদি একাধিক কম্পোনেন্টের একই প্রপের দরকার হয়। যে কম্পোনেন্টগুলোর ডেটা প্রয়োজন, তাদের নিকটতম সাধারণ পূর্বপুরুষ (nearest common ancestor) তাদের থেকে অনেক অনেক দূরে হতে পারে, আর এত বেশি উপরের স্তরে state কে উঠানো এমন একটা পরিস্থিতি তৈরি করতে পারে যাকে বলা হয় “prop drilling”।
State কে উপরে উঠানো


Prop drilling
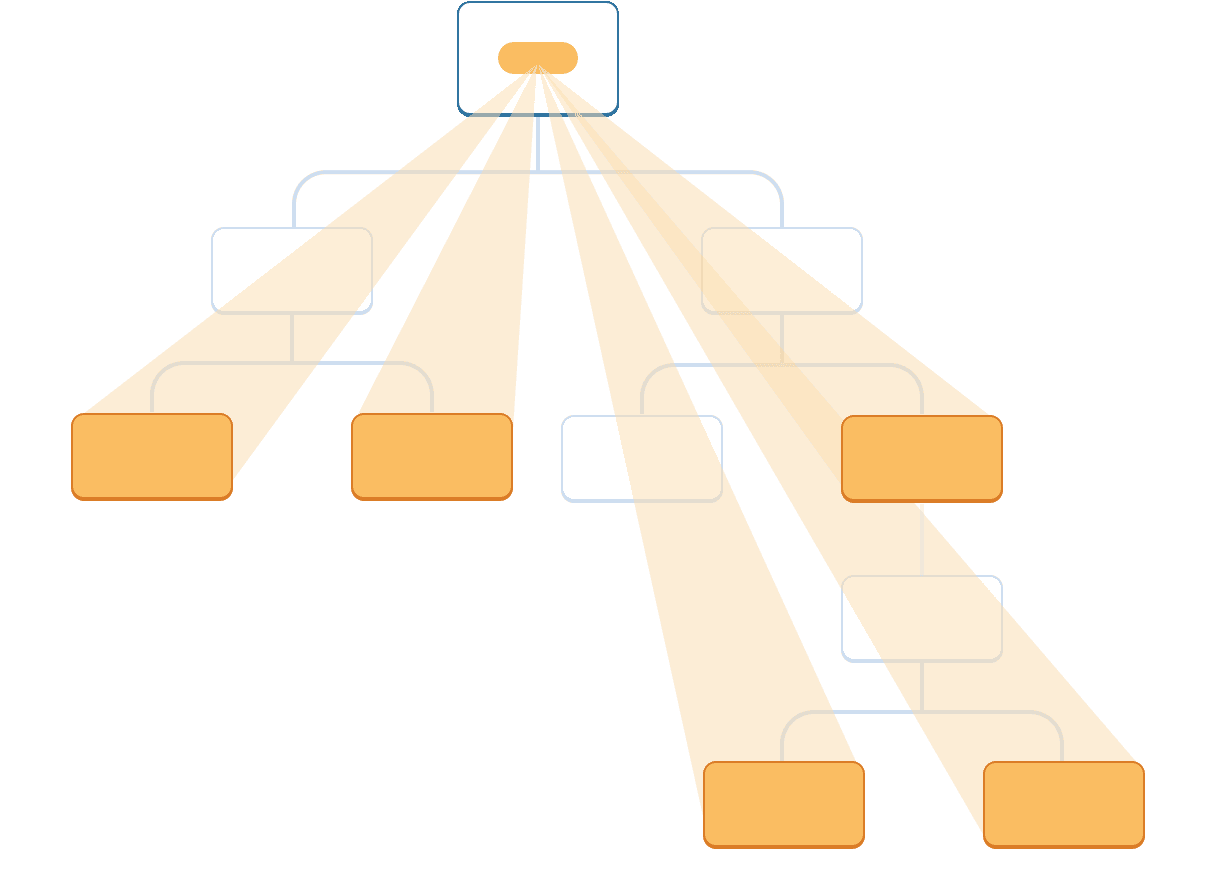
এমন হলে কী চমৎকার হতোনা যদি প্রপস পাস না করেই tree এর মধ্যে যে কম্পোনেন্টগুলোর ডেটাটি প্রয়োজন সেগুলোর কাছে ডেটাকে “ম্যাজিকের মতো” নিয়ে যাওয়ার কোন উপায় থাকতো? React এর context ফিচারই হলো সে উপায়!
কনটেক্সট: প্রপস পাস করার একটি বিকল্প পদ্ধতি
কনটেক্সট একটি প্যারেন্ট কম্পোনেন্টকে এর নিম্নস্থ সকল কম্পনেন্টের tree কে ডেটা সরবরাহ করতে দেয়। কনটেক্সটের বহু ব্যবহার রয়েছে। একটি উদাহরণ দেখা যাক। এই Heading কম্পোনেন্টকে একটু দেখুন যেটি এর সাইজের জন্য কোনো level গ্রহণ করে:
import Heading from './Heading.js';
import Section from './Section.js';

export default function Page() {
  return (
    <Section>
      <Heading level={1}>Title</Heading>
      <Heading level={2}>Heading</Heading>
      <Heading level={3}>Sub-heading</Heading>
      <Heading level={4}>Sub-sub-heading</Heading>
      <Heading level={5}>Sub-sub-sub-heading</Heading>
      <Heading level={6}>Sub-sub-sub-sub-heading</Heading>
    </Section>
  );
}
ধরুন আপনি একই Section এর ভিতরের বিভিন্ন headings সবসময় একই সাইজের হোক এটা চান:
import Heading from './Heading.js';
import Section from './Section.js';

export default function Page() {
  return (
    <Section>
      <Heading level={1}>Title</Heading>
      <Section>
        <Heading level={2}>Heading</Heading>
        <Heading level={2}>Heading</Heading>
        <Heading level={2}>Heading</Heading>
        <Section>
          <Heading level={3}>Sub-heading</Heading>
          <Heading level={3}>Sub-heading</Heading>
          <Heading level={3}>Sub-heading</Heading>
          <Section>
            <Heading level={4}>Sub-sub-heading</Heading>
            <Heading level={4}>Sub-sub-heading</Heading>
            <Heading level={4}>Sub-sub-heading</Heading>
          </Section>
        </Section>
      </Section>
    </Section>
  );
}
এখন, প্রত্যেক <Heading> কে আপনার level প্রপটি আলাদা আলাদা করে পাস করতে হচ্ছে:
<Section>
  <Heading level={3}>About</Heading>
  <Heading level={3}>Photos</Heading>
  <Heading level={3}>Videos</Heading>
</Section>
এটা আরো সুন্দর হতো যদি আপনি এর বদলে level প্রপটিকে <Section> কম্পোনেন্টকে পাস করতে, আর <Heading> থেকে রিমুভ করতে পারতেন। এভাবে আপনি নিশ্চিত করতে পারতেন যে, একই সেকশনের সব হেডিংস একই সাইজের হবে:
<Section level={3}>
  <Heading>About</Heading>
  <Heading>Photos</Heading>
  <Heading>Videos</Heading>
</Section>
কিন্তু <Heading> কম্পোনেন্টটি কিভাবে এর সবচেয়ে কাছের <Section> এর level জানবে? তা করার জন্য tree এর উপরের কোথাও বিদ্যমান ডাটা, চাইল্ডের “তালাশ করার” জন্য কোনো উপায় থাকা লাগবে।
আপনি শুধু প্রপস দিয়েই এটা করতে পারবেন না। এখানেই context এর ভূমিকা চলে আসে। আপনার তা তিনটি ধাপে করতে হবে:
- একটি কনটেক্সট Create করা। (আপনি এর নাম দিবেন
LevelContext, কেননা এটা হেডিং লেভেলের জন্য।) - যেসব কম্পোনেন্টের ডেটটি প্রয়োজন তাদের মধ্যে কনেটেক্সটটি Use করা। (
Headingকম্পোনেন্টটিLevelContextকে use করবে।) - যে কম্পোনেন্টটি ডেটাটিকে স্পেসিফাই (উল্লেখ) করে তাদের থেকে কনটেক্সটটি Provide করা। (
Sectionকম্পোনেন্টটিLevelContextকে provide করবে।)
Context একটি প্যারেন্টকে—এমনকি অনেক দূরের হলেও—এর নিচের সম্পূর্ণ tree কে কিছু ডেটা provide (সরবরাহ) করতে দেয়।
কাছের চিলড্রেনদের জন্য context এর ব্যবহার


দূরের চিলড্রেনদের জন্য context এর ব্যবহার

ধাপ ১: কনটেক্সটটি create করুন
প্রথমে, আপনার কনটেক্সটটি create করতে হবে। আপনার একে একটি ফাইল থেকে export করতে হবে যাতে করে আপনার কম্পোনেন্টগুলো একে use করতে পারে:
import { createContext } from 'react';

export const LevelContext = createContext(1);
createContext এর একমাত্র আর্গুমেন্ট হলো default ভ্যালু। এখানে 1 দ্বারা উদ্দেশ্য হলো সবচেয়ে বড় হেডিং লেভেল, কিন্তু আপনি যেকোনো ধরনের ভ্যালু (এমনকি একটি object) পাস করতে পারতেন। আপনি এই ডিফল্ট ভ্যালুর গুরুত্ব এর পরের ধাপে উপলব্ধি করতে পারবেন।
ধাপ ২: কনটেক্সটটি use করুন
useContext হুককে React থেকে এবং আপনার কনটেক্সট import করুন:
import { useContext } from 'react';
import { LevelContext } from './LevelContext.js';
বর্তমানে, Heading কম্পোনেন্টটি প্রপস থেকে level কে read করছে:
export default function Heading({ level, children }) {
  // ...
}
এর পরিবর্তে, level প্রপটিকে রিমুভ করে দিন এবং আপনি LevelContext নামের যে কনটেক্সটটিকে মাত্র import করেছেন তার থেকে ভ্যালুটি read করুন:
export default function Heading({ children }) {
  const level = useContext(LevelContext);
  // ...
}
useContext একটি হুক। ঠিক useState এবং useReducer এর মতো, আপনি একটি হুককে React কম্পোনেন্টের ভিতর শুধুমাত্র সবার শুরুতে কল করতে পারবেন (লুপ কিংবা কন্ডিশনের ভিতর না)। useContext রিয়েক্টকে বলে দেয় যে Heading কম্পোনেন্টটি LevelContext কে read করতে চাচ্ছে।
এখন যেহেতু Heading কম্পোনেন্টটির কোনো level প্রপ নেই, আপনার লেভেল প্রপটিকে JSX এর ভিতর Heading কে এভাবে পাস করার কোনো প্রয়োজন নেই:
<Section>
  <Heading level={4}>Sub-sub-heading</Heading>
  <Heading level={4}>Sub-sub-heading</Heading>
  <Heading level={4}>Sub-sub-heading</Heading>
</Section>
JSX কে আপডেট করুন যাতে এর পরিবর্তে লেভেলটিকে শুধুমাত্র Section রিসিভ করে:
<Section level={4}>
  <Heading>Sub-sub-heading</Heading>
  <Heading>Sub-sub-heading</Heading>
  <Heading>Sub-sub-heading</Heading>
</Section>
মনে আছে তো, এই হলো সেই মার্কআপ যেটার মতো মার্কআপ নিয়ে কাজ করার আশা আপনি করছিলেন:
import Heading from './Heading.js';
import Section from './Section.js';

export default function Page() {
  return (
    <Section level={1}>
      <Heading>Title</Heading>
      <Section level={2}>
        <Heading>Heading</Heading>
        <Heading>Heading</Heading>
        <Heading>Heading</Heading>
        <Section level={3}>
          <Heading>Sub-heading</Heading>
          <Heading>Sub-heading</Heading>
          <Heading>Sub-heading</Heading>
          <Section level={4}>
            <Heading>Sub-sub-heading</Heading>
            <Heading>Sub-sub-heading</Heading>
            <Heading>Sub-sub-heading</Heading>
          </Section>
        </Section>
      </Section>
    </Section>
  );
}
খেয়াল করুন এই এক্সাম্পলটি এখন পর্যন্ত কাজ করছেনা! সব হেডিংয়ের সাইজ একই, কারণ আপনি কনটেক্সট use করলেও, এখনো আপনি একে provide করেননি। React জানেন কোথায় এই কনটেক্সটকে পাওয়া যাবে!
আপনি যদি কনটেক্সটি provide না করেন, React আপনি আগের ধাপে যে ডিফল্ট ভ্যালু ঠিক করে দিয়েছেন তাকেই ব্যবহার করবে। এই উদাহরণে, আপনি createContext এর আর্গুমেন্ট হিসেবে 1 ঠিক করে দিয়েছেন, useContext(LevelContext) তাই 1 রিটার্ন করছে, ফলে ঐসব হেডিংকে <h1> বানিয়ে দিচ্ছে। এখন প্রত্যেক Section থেকে এর নিজের কনটেক্সট provide করে চলুন এর সমাধান করা যাক।
ধাপ ৩: কনটেক্সটটি provide করুন
Section কম্পোনেন্টটি এর চিলড্রেনকে রেন্ডার করছে:
export default function Section({ children }) {
  return (
    <section className="section">
      {children}
    </section>
  );
}
চিলড্রেনকে context provider দিয়ে wrap করুন যাতে তাদেরকে LevelContext টি provide করতে পারেন:
import { LevelContext } from './LevelContext.js';

export default function Section({ level, children }) {
  return (
    <section className="section">
      <LevelContext.Provider value={level}>
        {children}
      </LevelContext.Provider>
    </section>
  );
}
এটা রিয়েক্টকে বলে দেয় যে: “যদি এই <Section> এর ভিতরের কোনো কম্পোনেন্ট LevelContext তালাশ করে, তবে তাকে এই level দিয়ে দাও”। তখন কম্পোনেন্টটি UI ট্রি এর ভিতর এর সবচেয়ে কাছের <LevelContext.Provider> এর ভ্যালু ইউজ করবে।
import Heading from './Heading.js';
import Section from './Section.js';

export default function Page() {
  return (
    <Section level={1}>
      <Heading>Title</Heading>
      <Section level={2}>
        <Heading>Heading</Heading>
        <Heading>Heading</Heading>
        <Heading>Heading</Heading>
        <Section level={3}>
          <Heading>Sub-heading</Heading>
          <Heading>Sub-heading</Heading>
          <Heading>Sub-heading</Heading>
          <Section level={4}>
            <Heading>Sub-sub-heading</Heading>
            <Heading>Sub-sub-heading</Heading>
            <Heading>Sub-sub-heading</Heading>
          </Section>
        </Section>
      </Section>
    </Section>
  );
}
ফলস্বরূপ আমরা অরিজিনাল কোডের মতো হুবহু ফলাফল পেলাম, কিন্তু আপনার level প্রপটিকে প্রত্যেক Heading কম্পোনেন্টে পাস করতে হয়নি! তার পরিবর্তে Heading কম্পোনেন্টটি এর হেডিং লেভেল, উপরস্থ সবচেয়ে কাছের Section থেকে “বুঝে নিতে” পারছে:
- আপনি
<Section>কেlevelপ্রপ পাস করলেন। Sectionএর চিলড্রেনকে<LevelContext.Provider value={level}>দিয়ে wrap করে নেয়।useContext(LevelContext)এর দ্বারাHeadingএর উপরস্থ নিকটতমlevelContextএর ভ্যালু তালাশ করে।
Using and providing context from the same component
Currently, you still have to specify each section’s level manually:
export default function Page() {
  return (
    <Section level={1}>
      ...
      <Section level={2}>
        ...
        <Section level={3}>
          ...
Since context lets you read information from a component above, each Section could read the level from the Section above, and pass level + 1 down automatically. Here is how you could do it:
import { useContext } from 'react';
import { LevelContext } from './LevelContext.js';

export default function Section({ children }) {
  const level = useContext(LevelContext);
  return (
    <section className="section">
      <LevelContext.Provider value={level + 1}>
        {children}
      </LevelContext.Provider>
    </section>
  );
}
With this change, you don’t need to pass the level prop either to the <Section> or to the <Heading>:
import Heading from './Heading.js';
import Section from './Section.js';

export default function Page() {
  return (
    <Section>
      <Heading>Title</Heading>
      <Section>
        <Heading>Heading</Heading>
        <Heading>Heading</Heading>
        <Heading>Heading</Heading>
        <Section>
          <Heading>Sub-heading</Heading>
          <Heading>Sub-heading</Heading>
          <Heading>Sub-heading</Heading>
          <Section>
            <Heading>Sub-sub-heading</Heading>
            <Heading>Sub-sub-heading</Heading>
            <Heading>Sub-sub-heading</Heading>
          </Section>
        </Section>
      </Section>
    </Section>
  );
}
Now both Heading and Section read the LevelContext to figure out how “deep” they are. And the Section wraps its children into the LevelContext to specify that anything inside of it is at a “deeper” level.
Context passes through intermediate components
You can insert as many components as you like between the component that provides context and the one that uses it. This includes both built-in components like <div> and components you might build yourself.
In this example, the same Post component (with a dashed border) is rendered at two different nesting levels. Notice that the <Heading> inside of it gets its level automatically from the closest <Section>:
import Heading from './Heading.js';
import Section from './Section.js';

export default function ProfilePage() {
  return (
    <Section>
      <Heading>My Profile</Heading>
      <Post
        title="Hello traveller!"
        body="Read about my adventures."
      />
      <AllPosts />
    </Section>
  );
}

function AllPosts() {
  return (
    <Section>
      <Heading>Posts</Heading>
      <RecentPosts />
    </Section>
  );
}

function RecentPosts() {
  return (
    <Section>
      <Heading>Recent Posts</Heading>
      <Post
        title="Flavors of Lisbon"
        body="...those pastéis de nata!"
      />
      <Post
        title="Buenos Aires in the rhythm of tango"
        body="I loved it!"
      />
    </Section>
  );
}

function Post({ title, body }) {
  return (
    <Section isFancy={true}>
      <Heading>
        {title}
      </Heading>
      <p><i>{body}</i></p>
    </Section>
  );
}
You didn’t do anything special for this to work. A Section specifies the context for the tree inside it, so you can insert a <Heading> anywhere, and it will have the correct size. Try it in the sandbox above!
Context lets you write components that “adapt to their surroundings” and display themselves differently depending on where (or, in other words, in which context) they are being rendered.
How context works might remind you of CSS property inheritance. In CSS, you can specify color: blue for a <div>, and any DOM node inside of it, no matter how deep, will inherit that color unless some other DOM node in the middle overrides it with color: green. Similarly, in React, the only way to override some context coming from above is to wrap children into a context provider with a different value.
In CSS, different properties like color and background-color don’t override each other. You can set all <div>’s color to red without impacting background-color. Similarly, different React contexts don’t override each other. Each context that you make with createContext() is completely separate from other ones, and ties together components using and providing that particular context. One component may use or provide many different contexts without a problem.
Before you use context
Context is very tempting to use! However, this also means it’s too easy to overuse it. Just because you need to pass some props several levels deep doesn’t mean you should put that information into context.
Here’s a few alternatives you should consider before using context:
- Start by passing props. If your components are not trivial, it’s not unusual to pass a dozen props down through a dozen components. It may feel like a slog, but it makes it very clear which components use which data! The person maintaining your code will be glad you’ve made the data flow explicit with props.
- Extract components and pass JSX as
childrento them. If you pass some data through many layers of intermediate components that don’t use that data (and only pass it further down), this often means that you forgot to extract some components along the way. For example, maybe you pass data props likepoststo visual components that don’t use them directly, like<Layout posts={posts} />. Instead, makeLayouttakechildrenas a prop, and render<Layout><Posts posts={posts} /></Layout>. This reduces the number of layers between the component specifying the data and the one that needs it.
If neither of these approaches works well for you, consider context.
Use cases for context
- Theming: If your app lets the user change its appearance (e.g. dark mode), you can put a context provider at the top of your app, and use that context in components that need to adjust their visual look.
- Current account: Many components might need to know the currently logged in user. Putting it in context makes it convenient to read it anywhere in the tree. Some apps also let you operate multiple accounts at the same time (e.g. to leave a comment as a different user). In those cases, it can be convenient to wrap a part of the UI into a nested provider with a different current account value.
- Routing: Most routing solutions use context internally to hold the current route. This is how every link “knows” whether it’s active or not. If you build your own router, you might want to do it too.
- Managing state: As your app grows, you might end up with a lot of state closer to the top of your app. Many distant components below may want to change it. It is common to use a reducer together with context to manage complex state and pass it down to distant components without too much hassle.
Context is not limited to static values. If you pass a different value on the next render, React will update all the components reading it below! This is why context is often used in combination with state.
In general, if some information is needed by distant components in different parts of the tree, it’s a good indication that context will help you.
পুনরালোচনা
- Context lets a component provide some information to the entire tree below it.
- To pass context:
- Create and export it with
export const MyContext = createContext(defaultValue). - Pass it to the
useContext(MyContext)Hook to read it in any child component, no matter how deep. - Wrap children into
<MyContext.Provider value={...}>to provide it from a parent.
- Create and export it with
- Context passes through any components in the middle.
- Context lets you write components that “adapt to their surroundings”.
- Before you use context, try passing props or passing JSX as
children.
Challenge 1 of 1: Replace prop drilling with context
In this example, toggling the checkbox changes the imageSize prop passed to each <PlaceImage>. The checkbox state is held in the top-level App component, but each <PlaceImage> needs to be aware of it.
Currently, App passes imageSize to List, which passes it to each Place, which passes it to the PlaceImage. Remove the imageSize prop, and instead pass it from the App component directly to PlaceImage.
You can declare context in Context.js.
import { useState } from 'react';
import { places } from './data.js';
import { getImageUrl } from './utils.js';

export default function App() {
  const [isLarge, setIsLarge] = useState(false);
  const imageSize = isLarge ? 150 : 100;
  return (
    <>
      <label>
        <input
          type="checkbox"
          checked={isLarge}
          onChange={e => {
            setIsLarge(e.target.checked);
          }}
        />
        Use large images
      </label>
      <hr />
      <List imageSize={imageSize} />
    </>
  )
}

function List({ imageSize }) {
  const listItems = places.map(place =>
    <li key={place.id}>
      <Place
        place={place}
        imageSize={imageSize}
      />
    </li>
  );
  return <ul>{listItems}</ul>;
}

function Place({ place, imageSize }) {
  return (
    <>
      <PlaceImage
        place={place}
        imageSize={imageSize}
      />
      <p>
        <b>{place.name}</b>
        {': ' + place.description}
      </p>
    </>
  );
}

function PlaceImage({ place, imageSize }) {
  return (
    <img
      src={getImageUrl(place)}
      alt={place.name}
      width={imageSize}
      height={imageSize}
    />
  );
}